Taking Professional Health Care Photos on Your Own
Professional photography elevates your marketing by capturing visuals that build trust and credibility with your audience. With limited time to make a first impression, it’s critical to capitalize on any opportunity to build an emotional connection with your brand. Personalized photos and videos can help provide a sense of authenticity and transparency for consumers, helping to establish trust and rapport before stepping foot into your physical space. For this reason, our Ask Fuel First question focuses on health care photography: How can I elevate my practice’s visuals to create a sense of credibility and personalize our marketing?
Use Cases for Photography
Investing in professional photography is a good use of marketing funds. As health care providers, one of your greatest strengths is your commitment to exceptional patient care. And one of the easiest ways to demonstrate this is through photos and video. Here are some common types and their use cases:
| Type of Photo | Use Case | Purpose / Reason |
| Headshots | – Website/Bio – Staff Highlight – Staff Recognition – Email Signatures – Business Cards – Appointment Cards | Demonstrate the professionalism of your team. |
| Group Shots | – Website/About Us – Google Business Profile – Digital Ads – Landing Pages – Social Media – Print Ads | Show the team-based approach to the patient experience. |
| Candid / Patient | – Website Services Pages – Before/After Gallery – Social Media Posts – Literature | Demonstrate patient care. |
| Interior Office | – Website – Marketing Materials | Familiarize the Patient with the Space (Clean and Comfortable) |
| Exterior Office | – Google Business Profile – Maps/Location Webpage | Ease of Identifying Office’s Location |
Patient Consent Required
There are multiple scenarios where photos and videos can benefit your practice. But before you start taking photos of your patients, you need to remember they are considered PHI (patient health information) and should be treated the same as any other patient records that must be in compliance with HIPAA. For this reason, your practice must obtain a signed patient release document for any photos or videos used on your website or other marketing materials. Cropping or distorting images doesn’t waive this requirement.
We recommend reviewing a patient release document with your local/HIPAA attorney. This also applies to using patient images from a practice where you previously worked. You must obtain new written consent since those photos are still the property of the previous practice.
Five Tips for Taking Your Own Photos
If you don’t want to spend much money on professionally shot photos, you can take them with a personal camera or mobile phone. Below are five tips to consider when choosing this method:
1. Lighting makes a difference
- Good lighting can make or break your photos. We recommend constant lighting, such as ring lights. Base-level lighting equipment can be inexpensive and easy to find on Amazon or similar retailers.
- Avoid using a flash when possible. Although a flash can light your subject, it can often cause overexposure and cast shadows.
- Avoid being in front of windows or any light source behind your subject.


2. Camera vs. phone
Don’t worry about buying an expensive camera. If you have a DSLR or mirrorless camera, that’s great! Smartphone cameras often work just as well. If you have a newer iPhone® or Android™ device, it can capture high-resolution photos suitable for viewing in most use cases on the web. Keep your camera stable by using a tripod or flat surface. A GorillaPod is great for smartphone stabilizing.
3. Orientation matters
Depending on the use case of the photos, consider the orientation. For example, headshots are commonly taken in portrait mode, whereas group shots are often better shot in landscape mode.
4. Aim for Consistency
When photos are taken at different times, you may experience inconsistencies.
- For headshots, each photo you take should have the same background and be taken from the same distance, angles and lighting.
- Reduce the noise. Use a solid background with a subtle pattern or no pattern at all.


5. Diversify your imagery
We recommend including subjects that represent a diverse demographic and vary in age, ethnicity and race. U.S. Census data can provide information on the demographics of your local market. Consumers connect with brands that they can identify with.
Before & After Galleries
Demonstrating services you provide, such as facial plastic surgery and cosmetic procedures, through before/after photography will help attract and convert new patient leads. We’ve assembled five tips for your team when taking photos for a before and after gallery.
- Aim for consistency
Choose one location in your office with a plain background and consistent lighting to photograph your subjects. All photos should be taken at the same distance and at the same angles. This ensures that the differences highlighted between the before and after photos show the improvement that the patient experienced post-surgery. Ask the patient to remove their makeup and any large accessories and wear the same clothes in the before and after images.
- Ensure adequate spacing
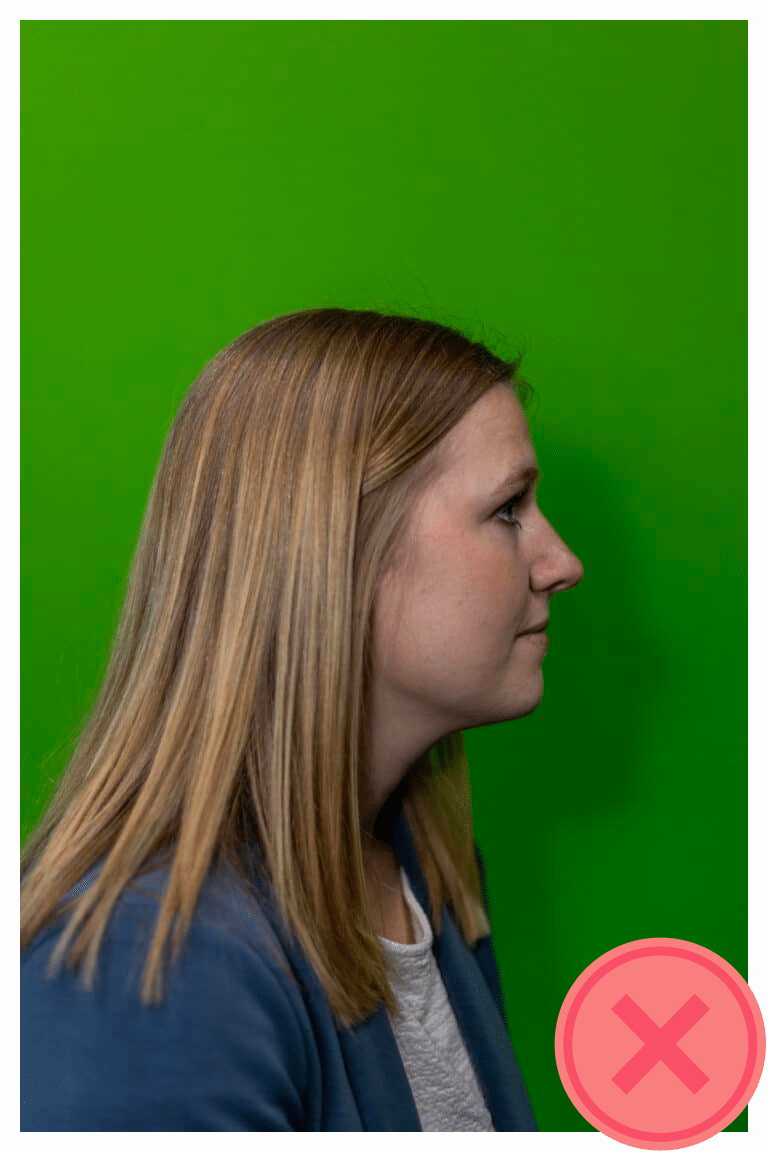
Position the subject in the center of the frame, with about 15% spacing on either side of the subject and about 15% above the subject’s head.Lean toward too much vs. too little space for cropping during editing.
- Take photos in portrait style
Take all photos in portrait orientation. This is a more natural composition for before/after galleries and makes for the best side-by-side viewing experience on mobile devices.
- Avoid using filters or stylizing the photos
The goal is to demonstrate the actual results of your work, so avoid doing anything that may make the photos look altered or manipulated.
- Capture all angles
Include photos of the subject looking left, right, up, down and directly at the camera. These angles may vary depending on the procedure, so capture the same angle in both before and after photos. If you use a three-quarter view of the subject’s face, ensure that the after photo is taken at the same angle.


Organize Your Before/After Files
Keep your photos named and organized in folders by type or subject. It will help with the long-term management of files while making it easy for your marketing team to work with them. Use unique identifiers for your images and create folders that your internal team and your external marketing partner will easily identify. A mix of names and numbers works great. Include a subject title without the patient’s name (Patient 1 vs. Sam Smith), the procedure name(s) and whether the image is the “before” or “after.”
For example:
Folder: Patient 1
- Patient1-Facelift-Before-Front.jpg
- Patient1-Facelift-Before-Left.jpg
- Patient1-Facelift-Before-Right.jpg
- Patient1-Facelift-After-Front.jpg
- Patient1-Facelift-After-Left.jpg
- Patient1-Facelift-After-Right.jpg
Folder: Patient 2
- Patient2-Rhino-Before-Front.jpg
- Patient2-Rhino-Before-Left.jpg
- Patient2-Rhino-Before-Right.jpg
- Patient2-Rhino-After-Front.jpg
- Patient2-Rhino-After-Left.jpg
- Patient2-Rhino-After-Right.jpg
Within the before/after galleries, include a Word or Excel document with the respective details. You can include the details in the supporting document for patients with multiple procedures. Provider names and post-operation time (e.g., three months post-op, six months post-op) are essential for providing transparency on the potential recovery.
And finally, display your best cases in your portfolio. You have limited time with website and social media visitors, so take advantage of their time by displaying your favorite work. We recommend including no more than six to eight subjects per procedure.
What About Video?
Like photography, video can help your web visitors connect with your practice and highlight your team’s expertise. Video can be incorporated on your website, social media channels and office waiting room TVs. The main differences in using video are that you need to account for sound quality and video editing. The tips highlighted above also apply to creating professional videos.
If you aren’t familiar with that process or want more information about healthcare photography, feel free to contact your Fuel Medical regional team.